
To set up an Instagram advertising campaign from scratch, I’ll guide you through the entire process, ensuring that you understand exactly what needs to be done at each stage for the best results. So, whether you’re a newcomer to Instagram advertising or you haven’t run ad campaigns before, this article will be invaluable. If you’ve previously run Instagram ad campaigns or currently have active ads but haven’t achieved the desired results, you can also go through this process to ensure a precise and optimal setup. Now, let’s get started—off we go! 🚀
How to advertise on Instagram
To optimize advertising on Instagram, you have two main effective options:
Method 1: Using Instagram Boost within mobile app
That’s not a way that I would recommend. The features are very much dumbed down. The functionality you’ve got is limited and because of that you’re likely to get worse results.
If you have a post that’s already performing well in terms of engagement, consider promoting it within the Instagram app. This quick and easy method allows you to scale up the post’s success and showcase it to new audiences who aren’t following you yet.
To get started, make sure you have a business or creator account on Instagram. Additionally, connect your Instagram account to a Facebook Business Page (you can find instructions on how to do this in Facebook Business Manager).
Once you’ve set up these prerequisites, it’s as simple as clicking ‘Boost Post’ on the specific post you want to turn into an ad.
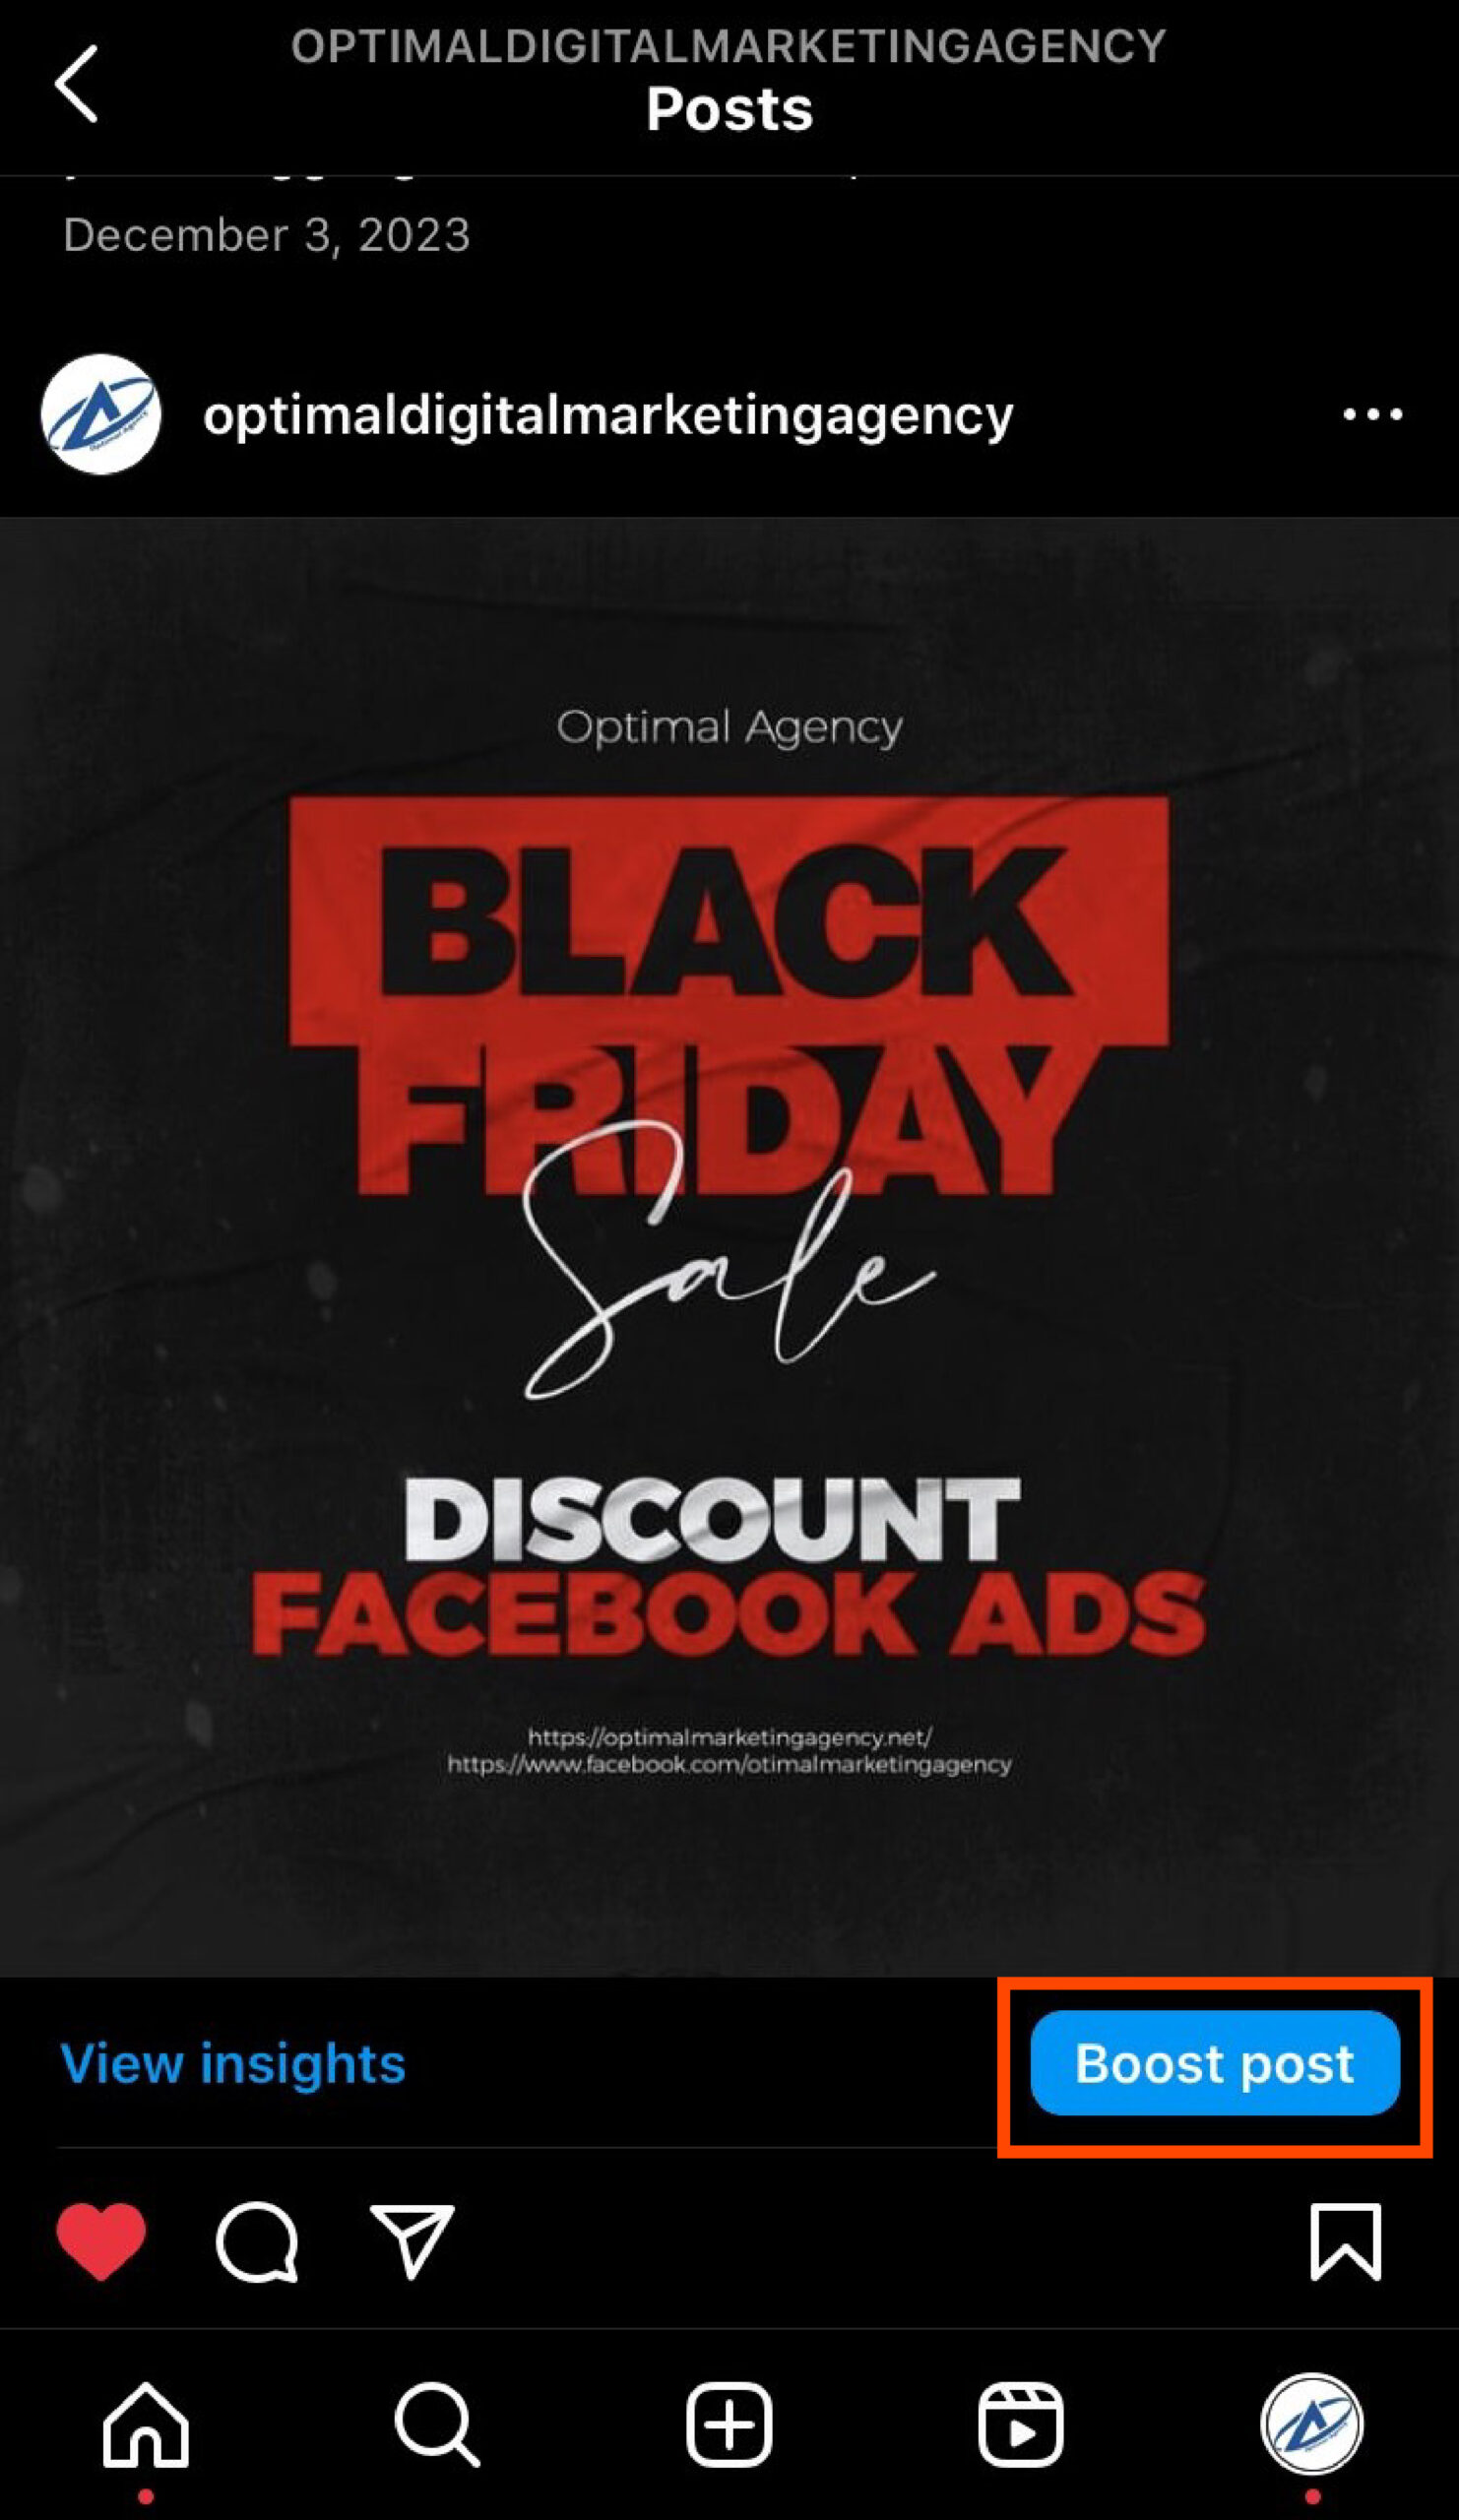
Next, choose your goal. You’ll have three options: more profile visits, more website visits, or more messages (this includes more WhatsApp messages).

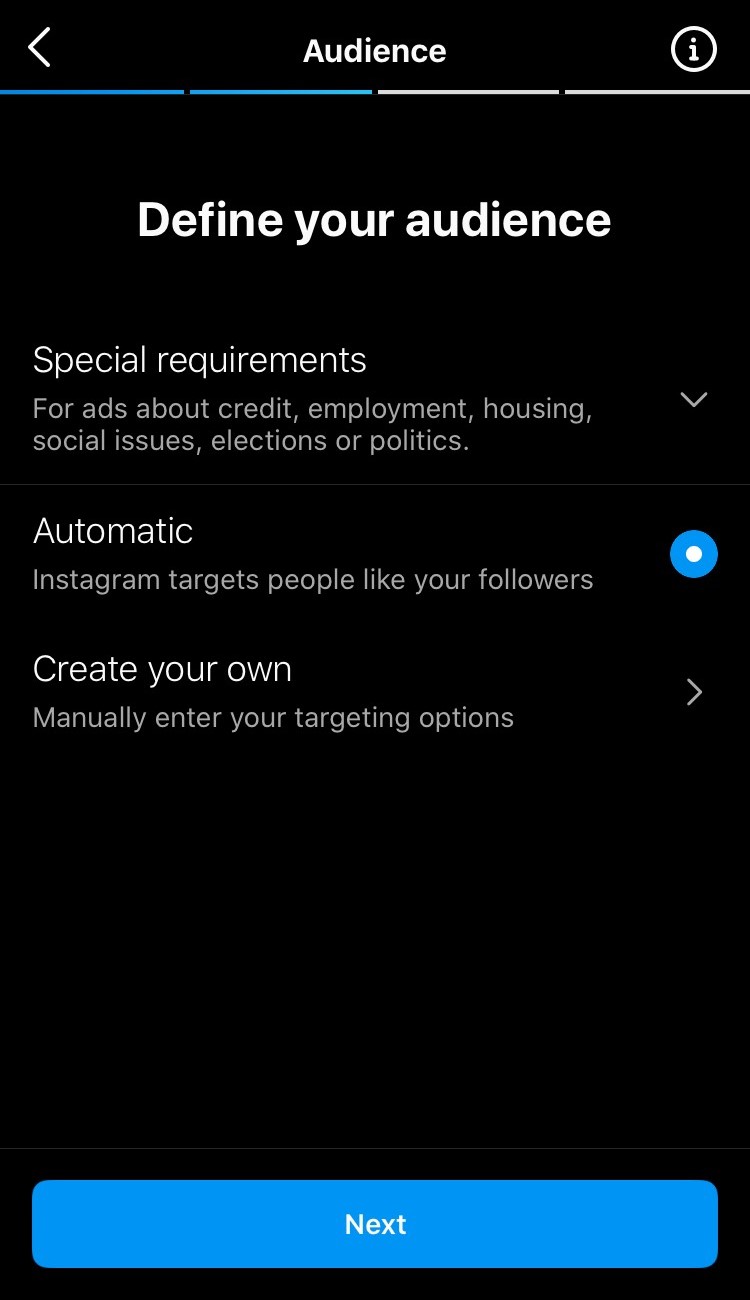
Then, define your audience. You can either choose to let Instagram automatically determine your audience (based on your follower data). Or, you can create your own audience by manually entering your targeting options.
You can also choose to run boosted post on Facebook, if you want.
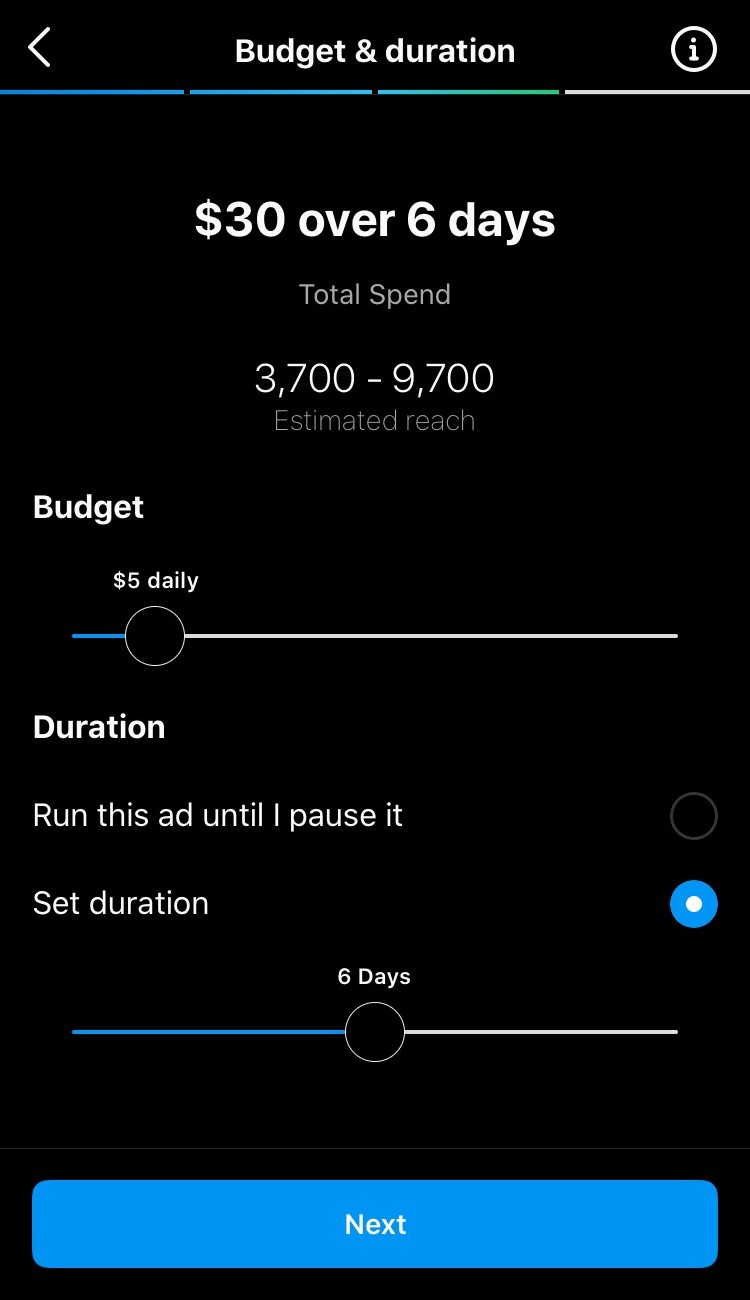
Now choose daily budget and the duration of time you want the ad to run. Decide how much you’re willing to spend on the ad per day. Choose a specific number of days for the ad to run, or let it run indefinitely until you manually pause it.
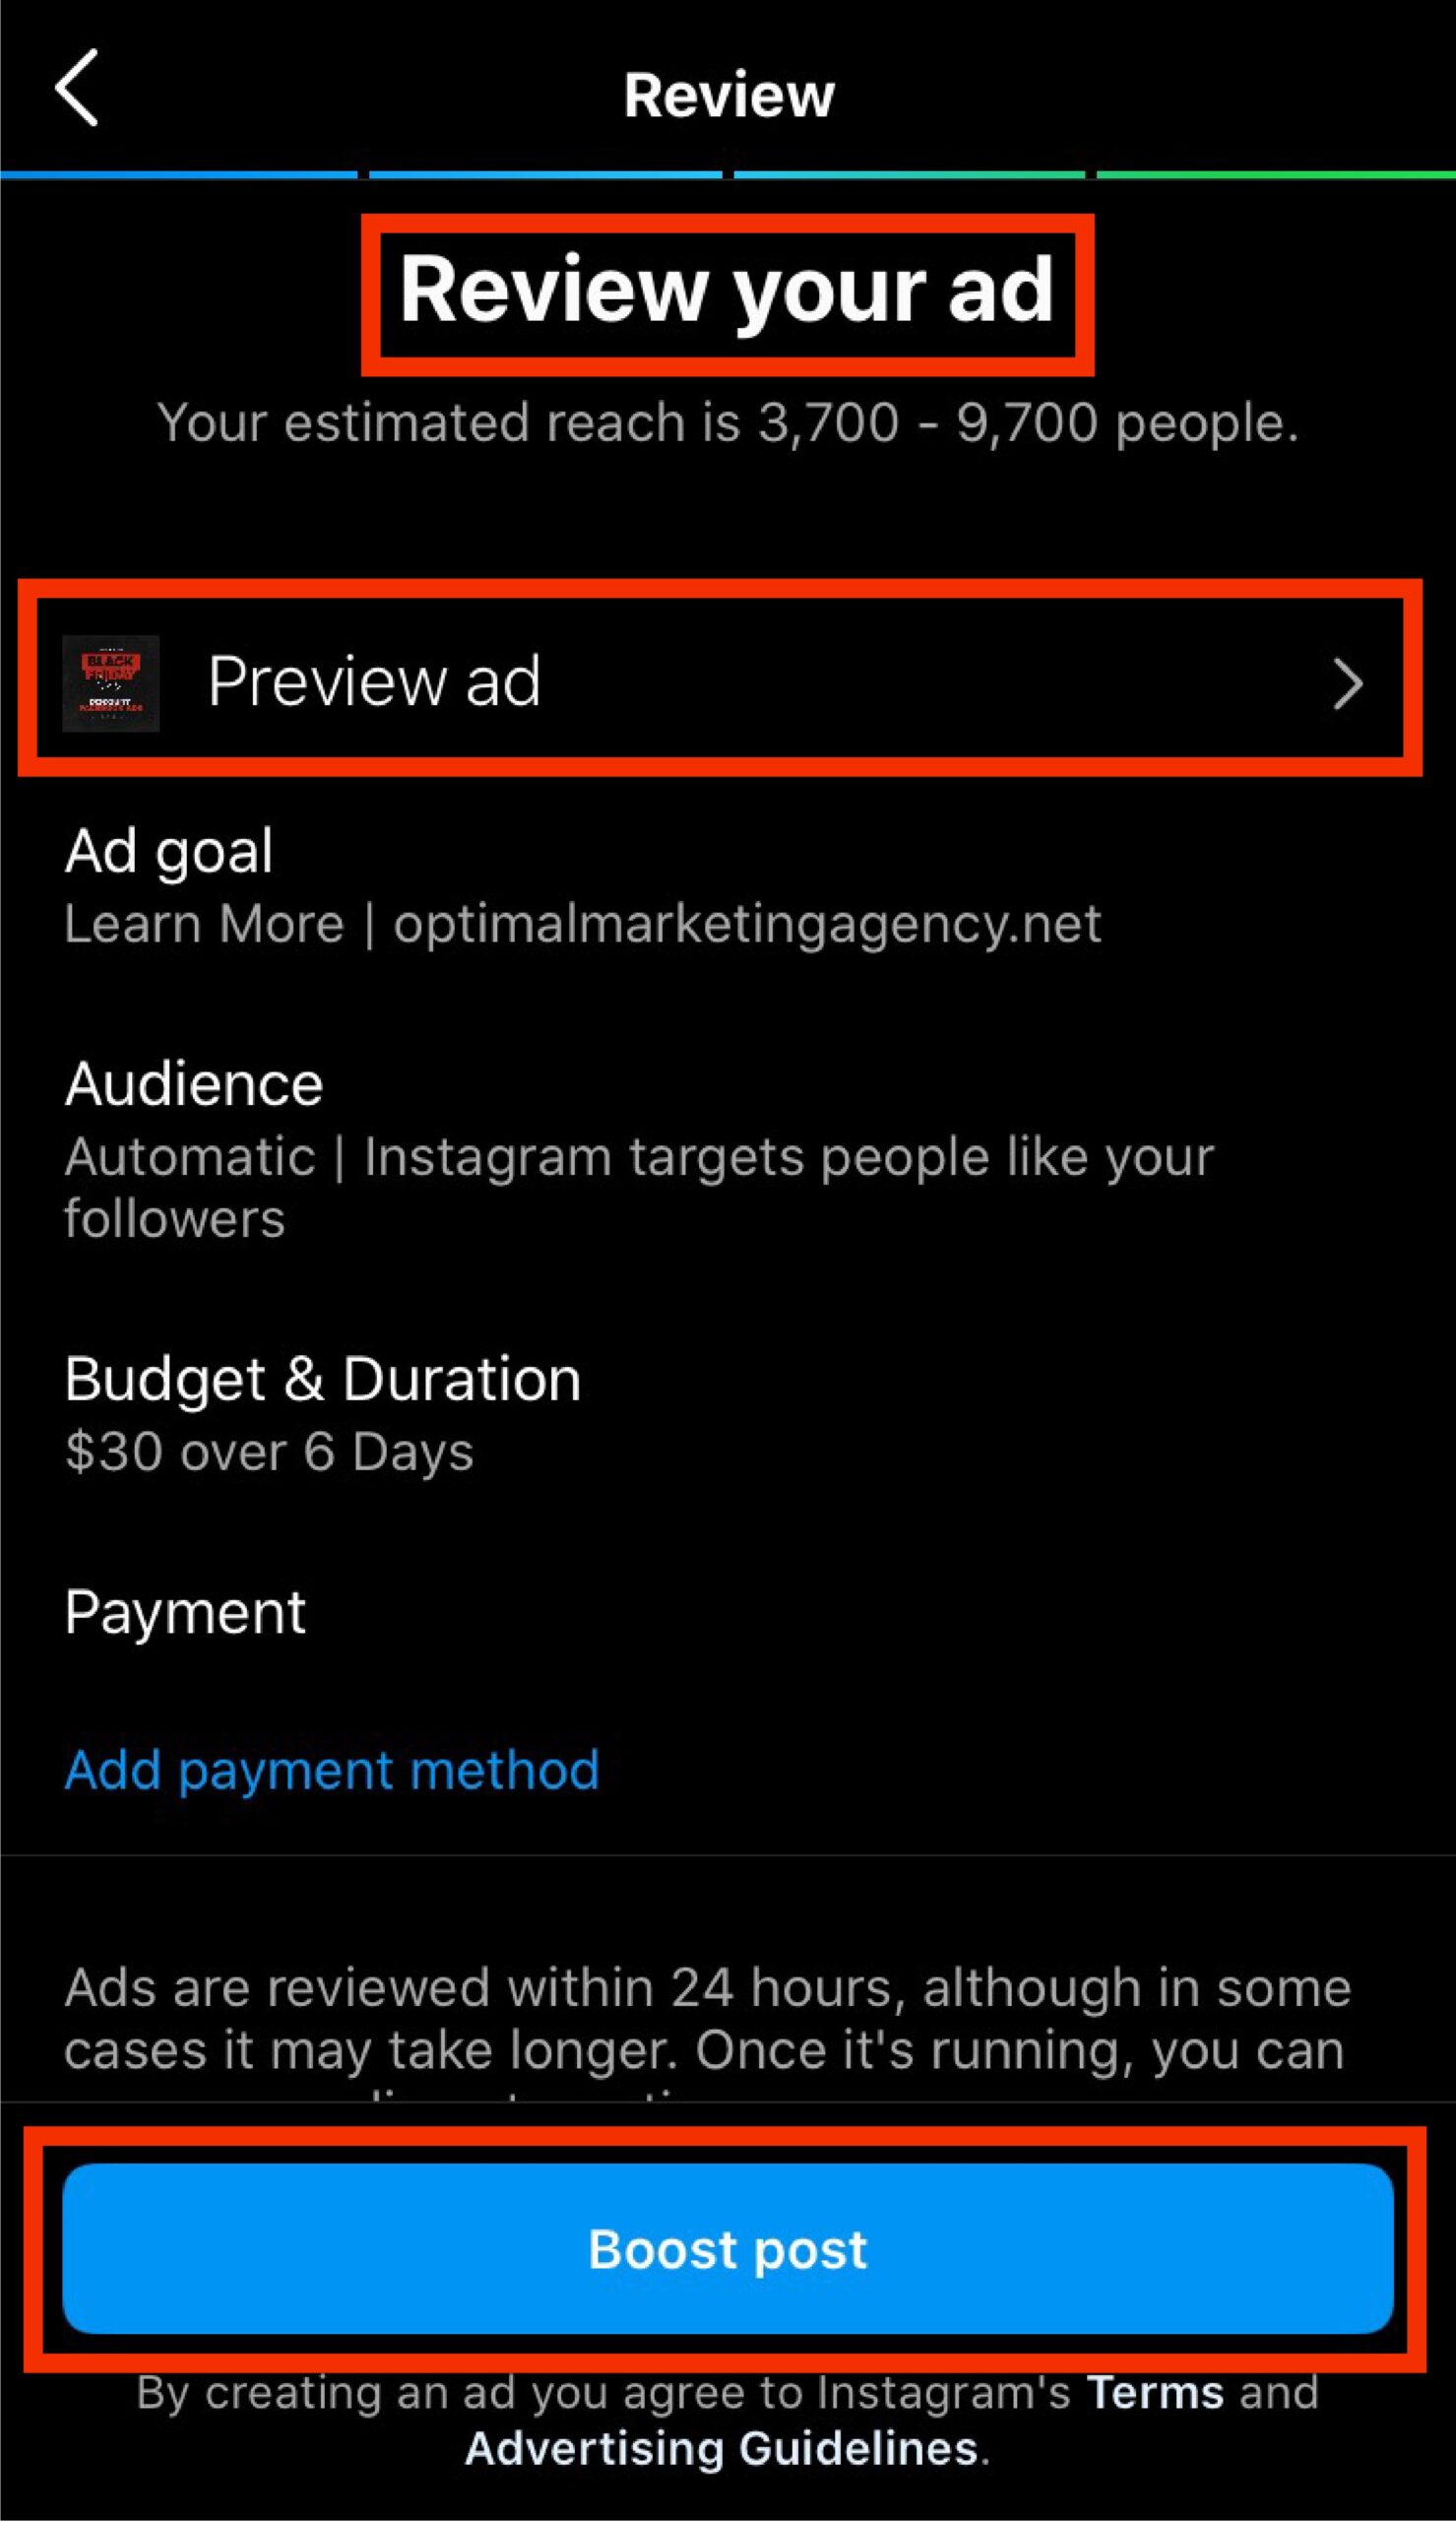
Finally, review your ad and click Boost post when you’re ready to go live.
Method 2: Advertise through a Meta (formerly Facebook) ad account
Meta currently owns Instagram and WhatsApp. To advertise on Instagram or both platforms, you need to set up a Meta ad account. Here’s how you can do it:
- Step 1: Create a Meta ad account (also known as a Meta Business account).
- Step 2: Set up your Instagram ad campaigns from the Meta ad account.
For optimal utilization of Instagram’s robust ad targeting, creative features, and reporting capabilities, consider leveraging the Meta Ads Manager to craft your ad campaigns (keep in mind that Meta is the parent company of Instagram). While it involves a tad more effort, our step-by-step guide will expertly walk you through the process.
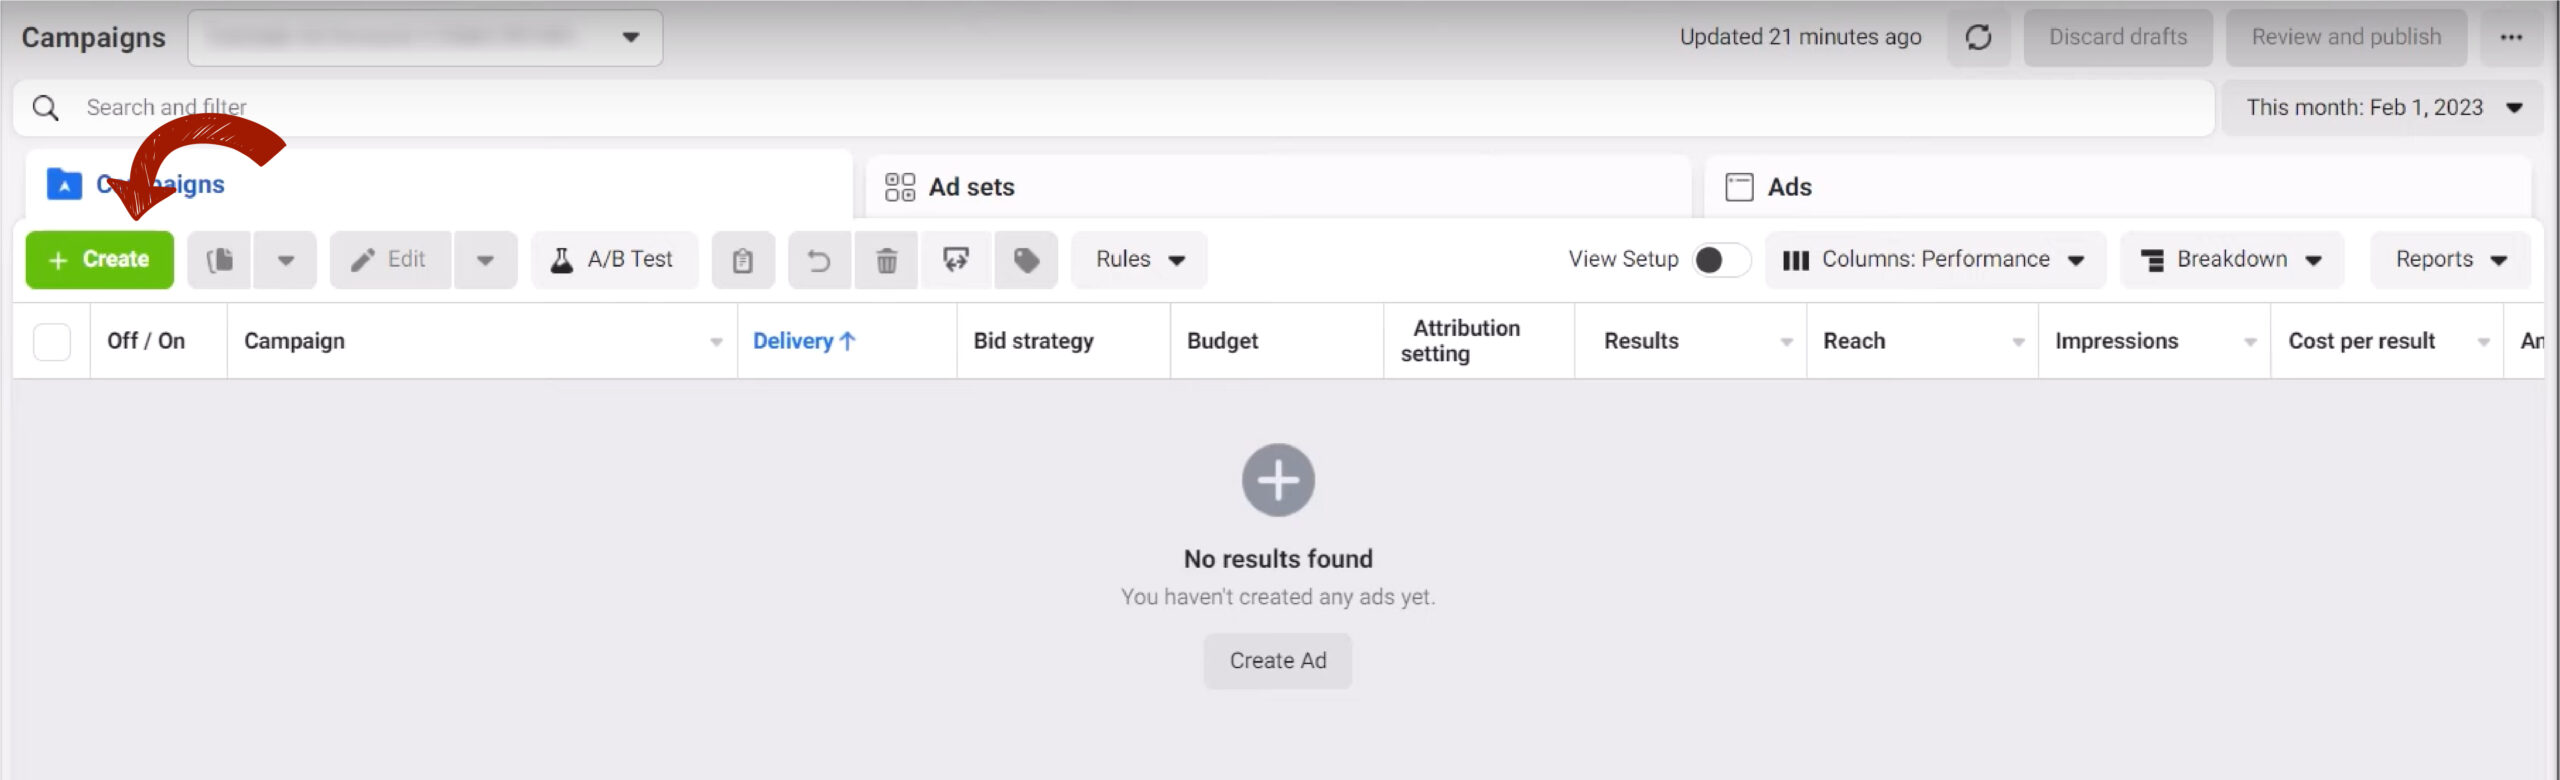
Step 1: Create a new Instagram ad campaign
To start, go to Meta Ads Manager and click Create.
When creating an Instagram ad campaign, it’s essential to understand that there are three distinct levels within the campaign structure:
- Campaign Level: At this top level, you set the overarching features of your campaign. It’s where you define the campaign’s objectives, budget, and schedule.
- Ad Set Level: Within the campaign, you’ll find ad sets. These represent the second level and allow you to fine-tune targeting. Here, you specify audience demographics, placements, and bidding strategies.
- Ad Level: Finally, within each ad set, you create individual ads. These govern the actual creative content, such as images or videos, and the accompanying text.

Step 2: Choose your objective
To kick off your campaign, start by selecting a buying type that aligns with your goals. This foundational step sets the tone for the entire process.
The first thing you need to do is select a buying type. The default option here is an auction. Not all accounts, but most, would have the option to switch to Reach and Frequency. I would strongly recommend that you go with the auction. The way this works is that you’re effectively bidding against all other Instagram advertisers for the people you want to target, and it’s simply done through an auction. That’s what sets the price. With Reach and Frequency, you can guarantee a certain price to reach a certain amount of people a certain number of times. It’s often used by bigger businesses that want to lock in a certain amount of exposure for a certain price. The issue with that is Reach and Frequency campaigns. Those ads are often put in front of people who are less likely to convert, less likely to make a purchase, less likely to become a lead, or whatever it is you’re looking to achieve with your Instagram ad campaigns. That’s how Meta is able to guarantee lower pricing because they’re going to put your ads in front of often lower quality prospects. So definitely go with the auction.

The next thing we want to do is select a campaign objective.
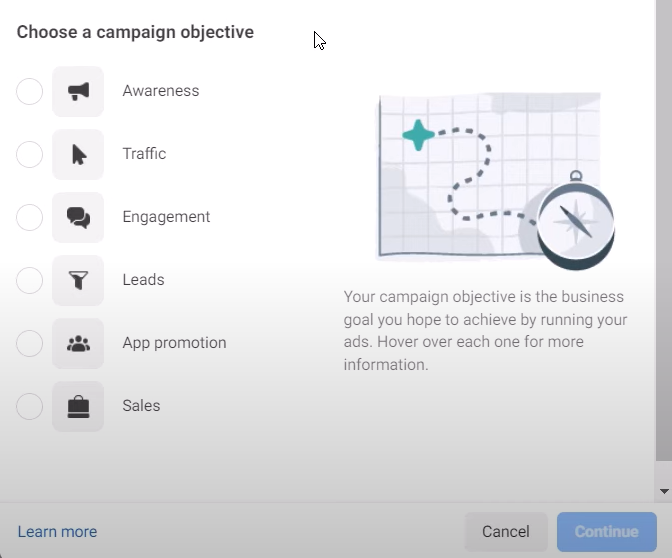
We have six different campaign objectives to choose from. So, the first thing you want to do is make sure you select the option that is most appropriate for your business. Now, most businesses— I would say 90% of the campaigns, probably more, that we run for our clients—are either lead campaigns or sales campaigns. This really depends on whether you’re an e-commerce business looking to generate purchases on your website (in which case, you’d want to go with sales), or if you’re a service-based or local business that wants people to sign up, become leads, or get in touch. You’ll see there are lots of other options, like awareness, traffic, and engagement. While those are great options, particularly for beginners, selecting them might lead to spending a lot of money without seeing any real results. Yes, you might send a bunch of people to your website with a traffic campaign, for example, but are those people likely to convert? Probably not. You’re much better off going for leads or sales and optimizing for exactly what you want.
I imagine that when you’re looking to advertise on Instagram, there’s a good chance you’re looking for more leads or more sales, or potentially both. That’s what the vast majority of businesses want from any marketing or advertising effort. Meta’s machine learning process that optimizes your campaigns for you is very powerful. Meta is very good at identifying the prospects on Instagram who are going to take the action that you want. For example, if you were to select a traffic campaign, Meta is very good at finding people on Instagram who click on ads often. However, it doesn’t necessarily mean they go on to convert. That’s why if you run a traffic campaign, you get a lot of link clicks, a lot of traffic to your website, but those people don’t necessarily do anything important for your business. Whereas if you go ahead and select leads or sales, Meta is going to try to find people who not only click but then go on to actually take those actions—become a lead, inquire, or make a purchase.
Step 3: Name your campaign
Once you’ve selected your campaign objective, just go ahead and click continue. Then, we get presented with some more options at the campaign level. Obviously, you want to give your campaign a name. But if you have different campaigns for different product ranges, for example, you would want to label it accordingly so you can easily see your results and how they’re performing in your ad account.
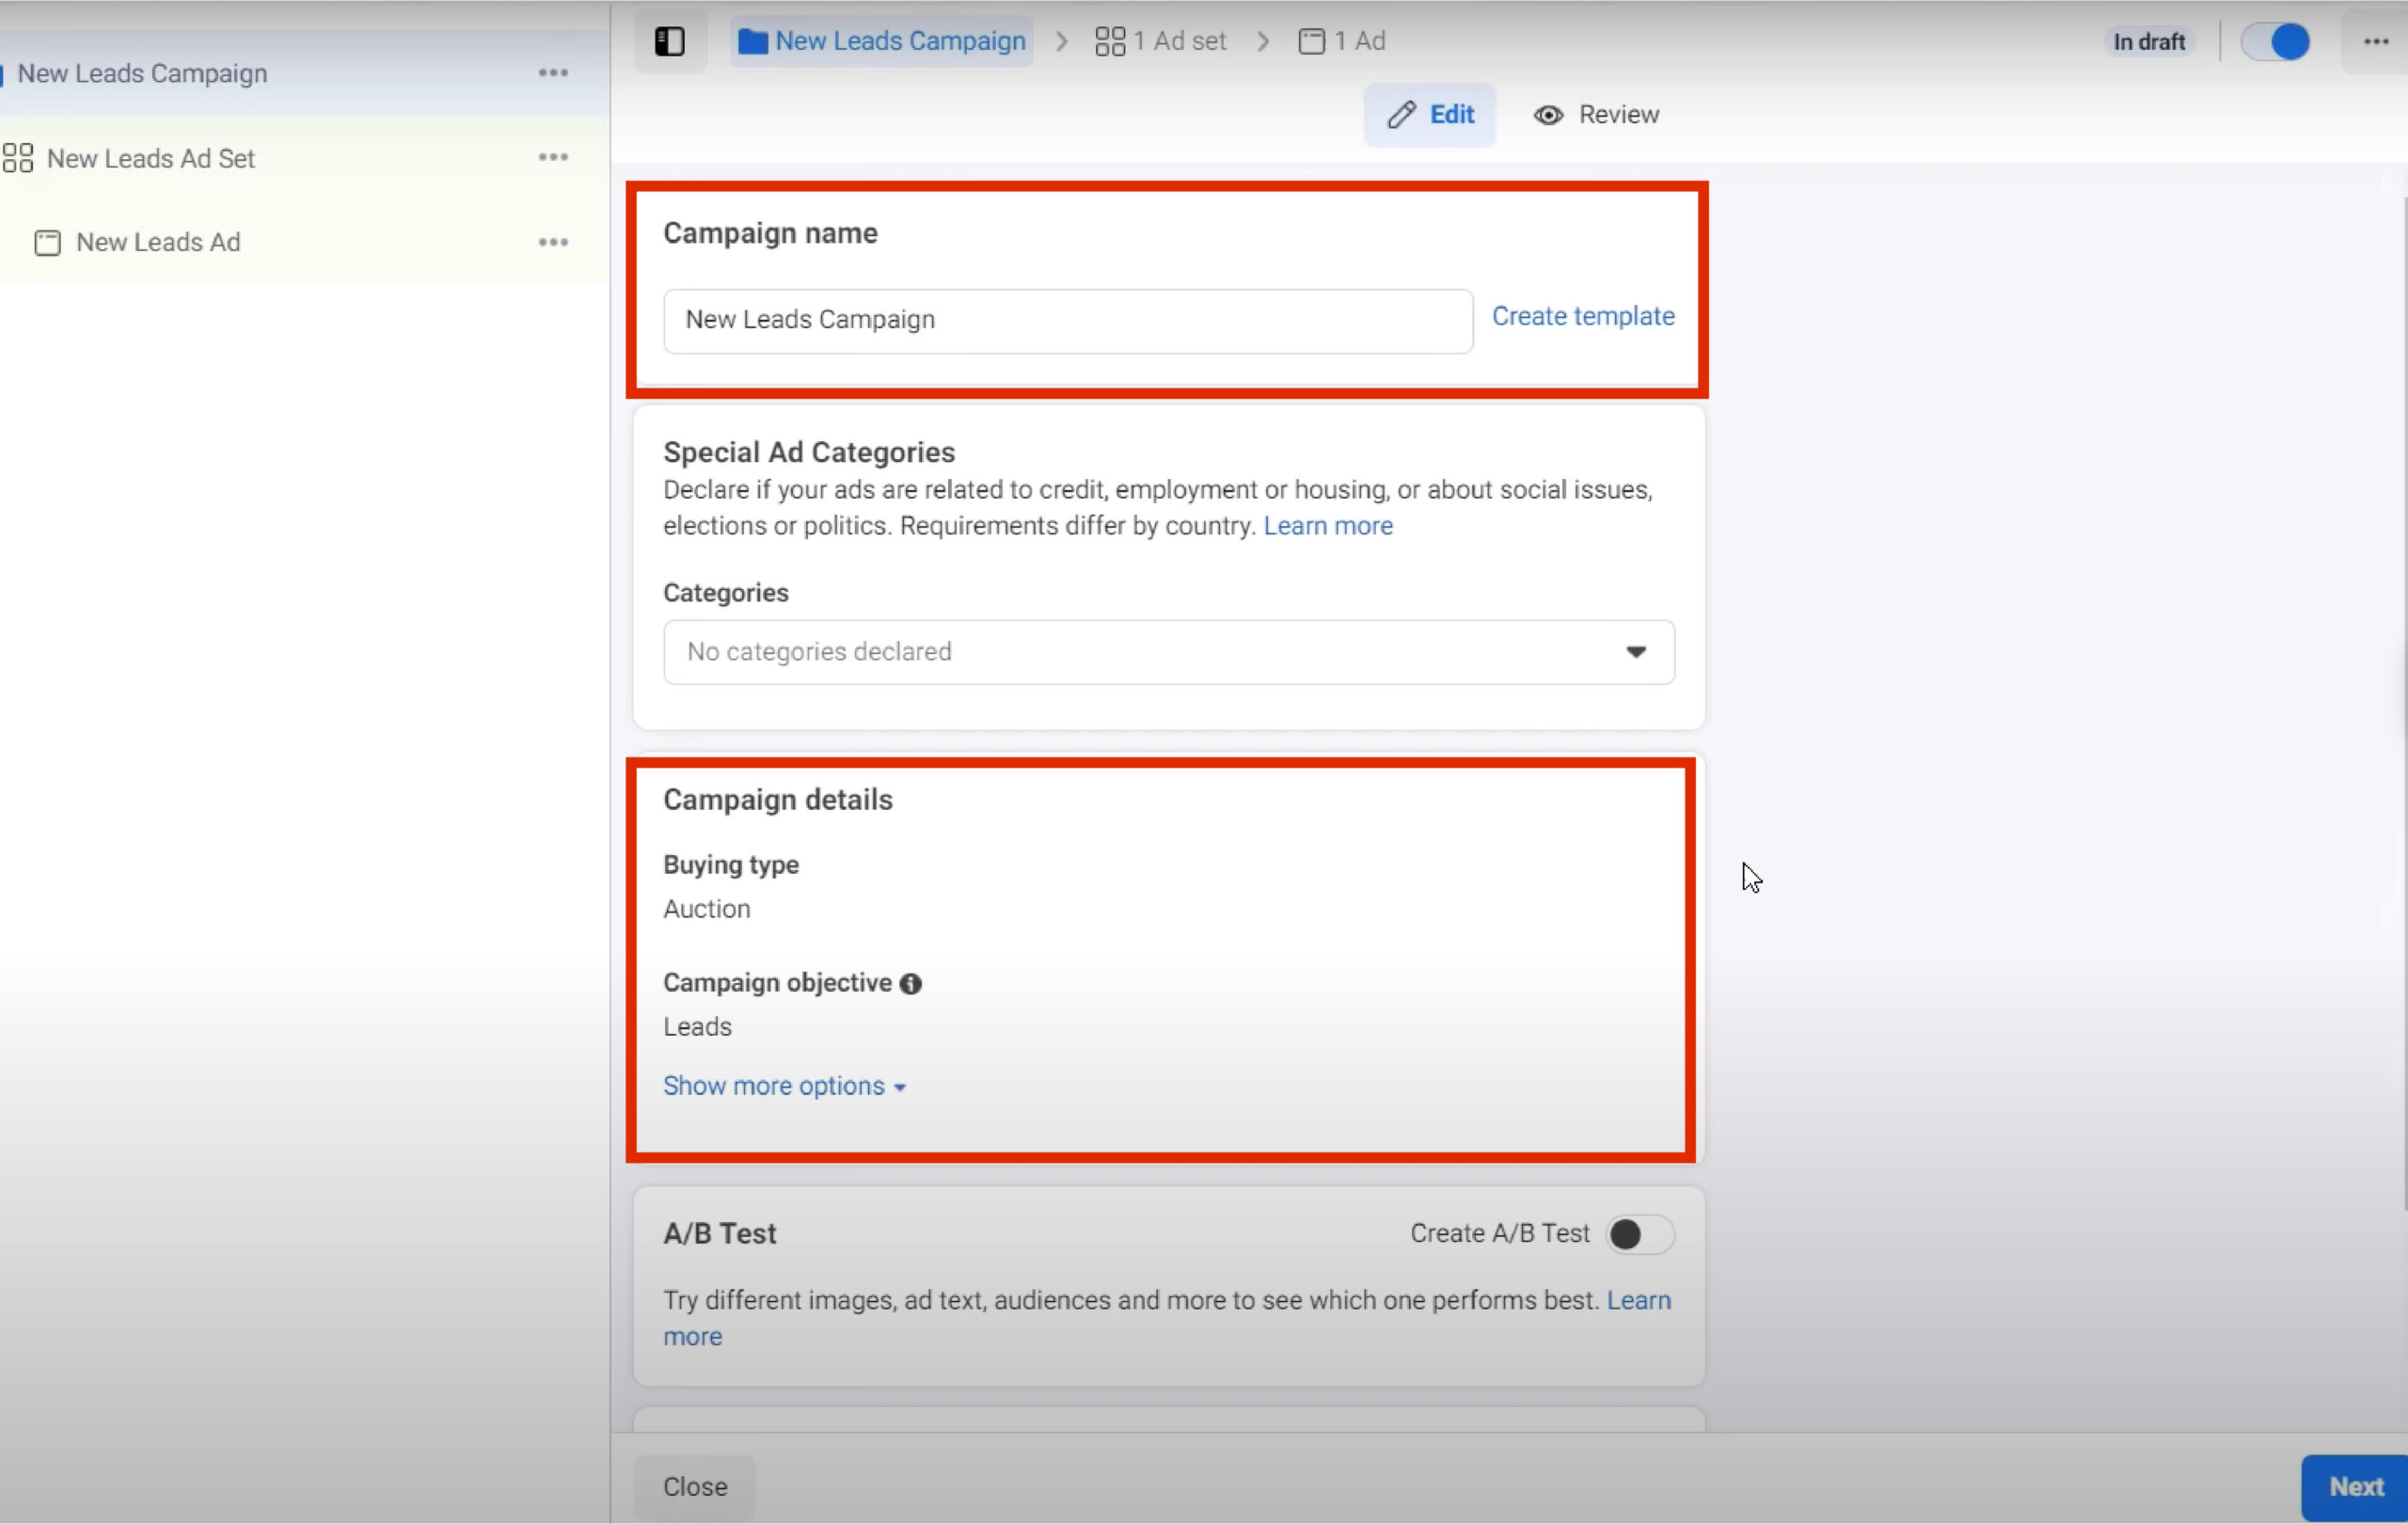
Once you’ve chosen a name, click Next.
Step 4: Set up special ad categories
The next section is special ad categories. It’s very important that if your ads are going to fall within a special ad category, you declare it in this section. If you don’t declare it, that’s a very good way to get your ad account disabled, or you could even have your Instagram profile banned or temporarily restricted, etc.
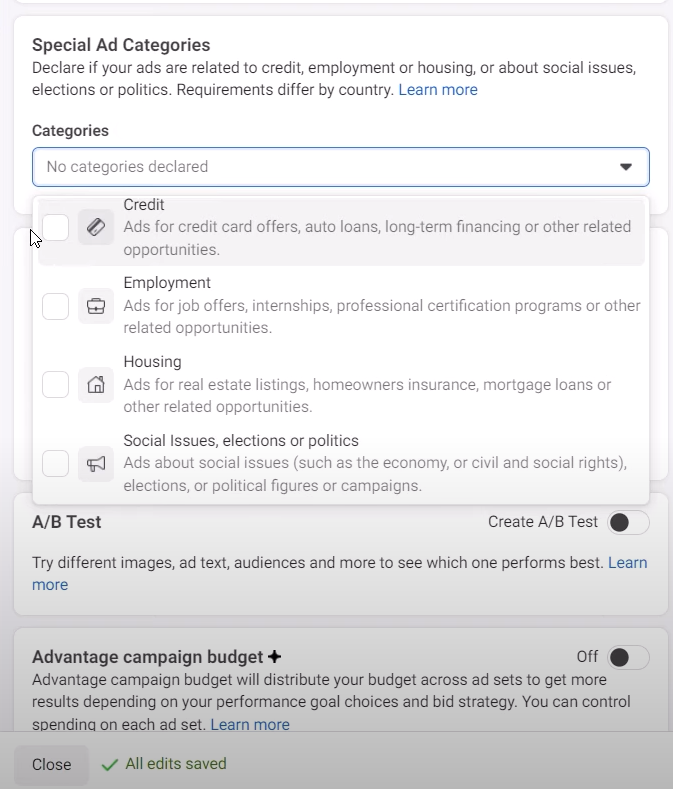
Are your ads related to credit, employment, housing, or social issues, for example? If they are, go ahead and select the category that applies. If you’re a little bit unsure about this, Meta does provide more information. You can click on “Learn more” or take a look at the advertising policies to see where you might fall. If you’re unsure, I would recommend going ahead and declaring it. When you do declare it, unfortunately, you are going to lose some functionality, particularly on the targeting side of things. But it is worth it to avoid having your ad account disabled or restricted. That is something that’s very difficult to deal with and could be very damaging for your business. Most people are not going to need to select these categories, but if you do, make sure you do go ahead and select them.
Then, we’ve got this campaign details section. We’ve already talked about the buying type and campaign objective. I don’t want you to select any A/B tests. It’s a useful tool once you get more advanced, but when you’re an Instagram advertising beginner and you’re creating your first campaigns, it’s more complicated than you need to make it. I think it’s really important that we set this up in a way that is relatively straightforward for you to run.
Step 5: Choose your budget and schedule
Once you know what you want your ad to look like, choose New [your ad goal here] Ad Set from the left-hand menu.
Here, you can choose how much you want to spend and how long your campaign will run.
For your budget, you’ll have two options:
- Daily budget: Set a maximum daily spend, useful for always-on ads
- Lifetime budget: Set a maximum spend for your whole campaign, useful for ads with a clear end date
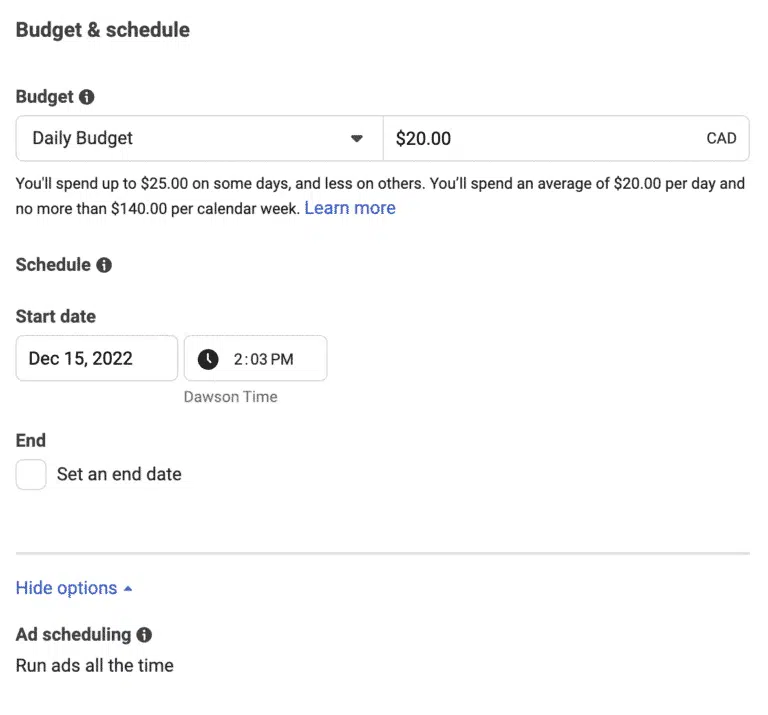
Under Ad Scheduling you can choose to run ads continuously (most common), or only at certain times of day (for example, if you’re a food delivery company and only want to run ads in the evening when your audience is most likely to place delivery orders).
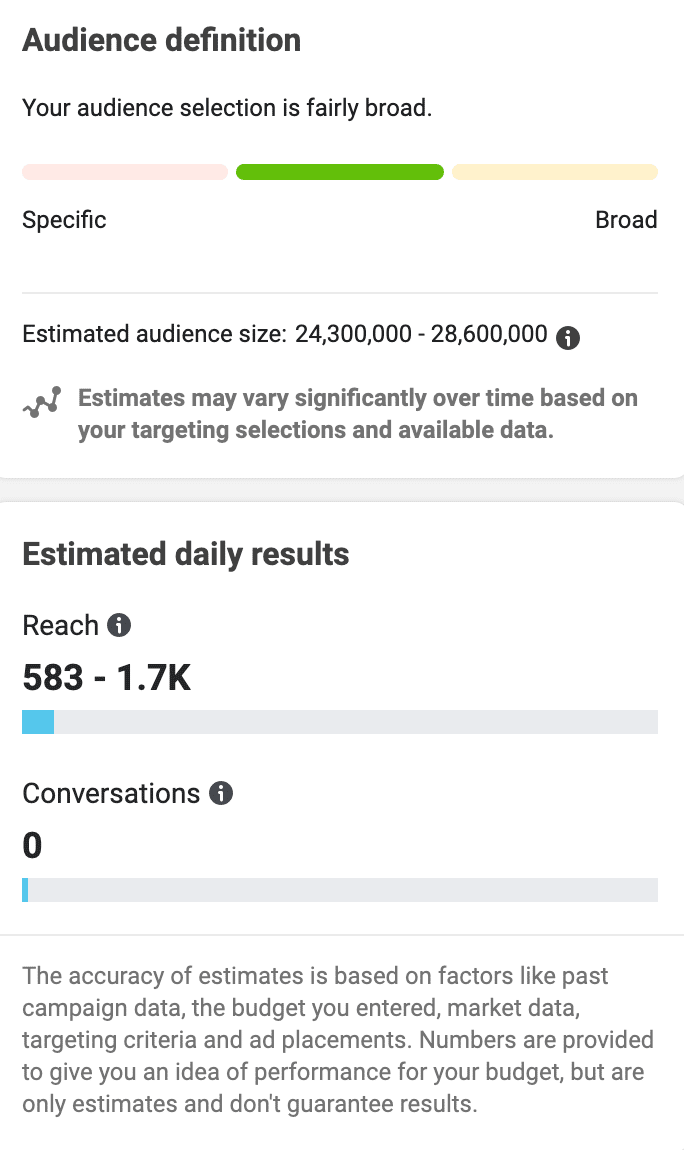
As you adjust these options, you’ll see the Audience Definition and Estimated Daily Results modules in the right-hand column, which will give you an idea of your budget’s expected reach.
Pro tip: Try to make your ad set fall in the middle of the green range.
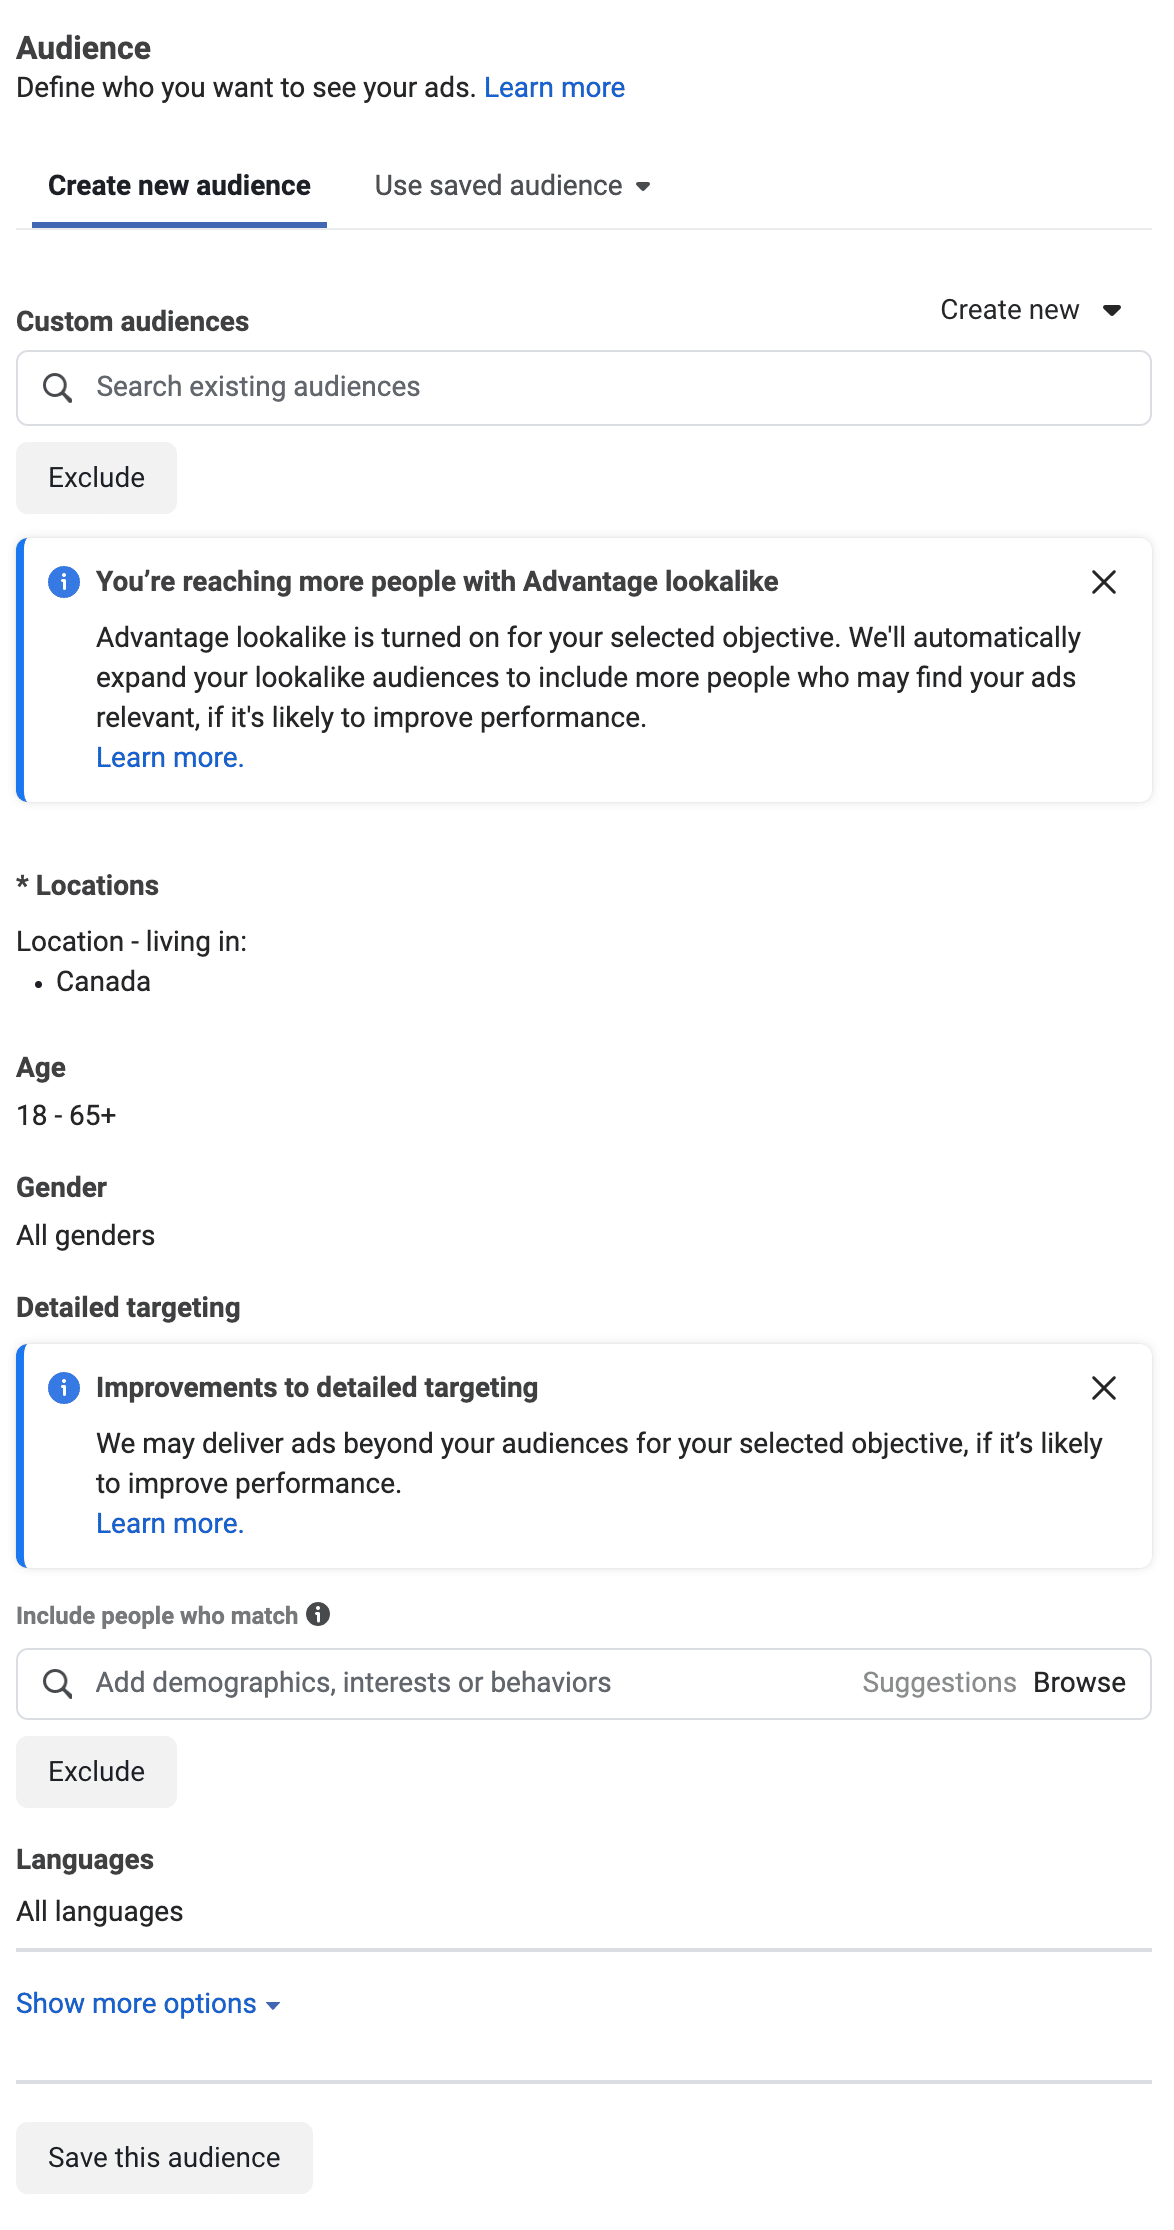
Step 6: Identify your audience
Now it’s time to choose your audience.
You can either use a previously saved audience or create a new audience.
Saved Audiences are useful if you have your own custom audience data (i.e. past website visitors) or past audiences from previous campaigns that performed well. If not, you can create a new audience based on demographics, interests, and behavioral targeting.
If you choose to create a new audience, you’ll have the option to target by location, age range, gender, demographics, interests, behaviours, and languages.
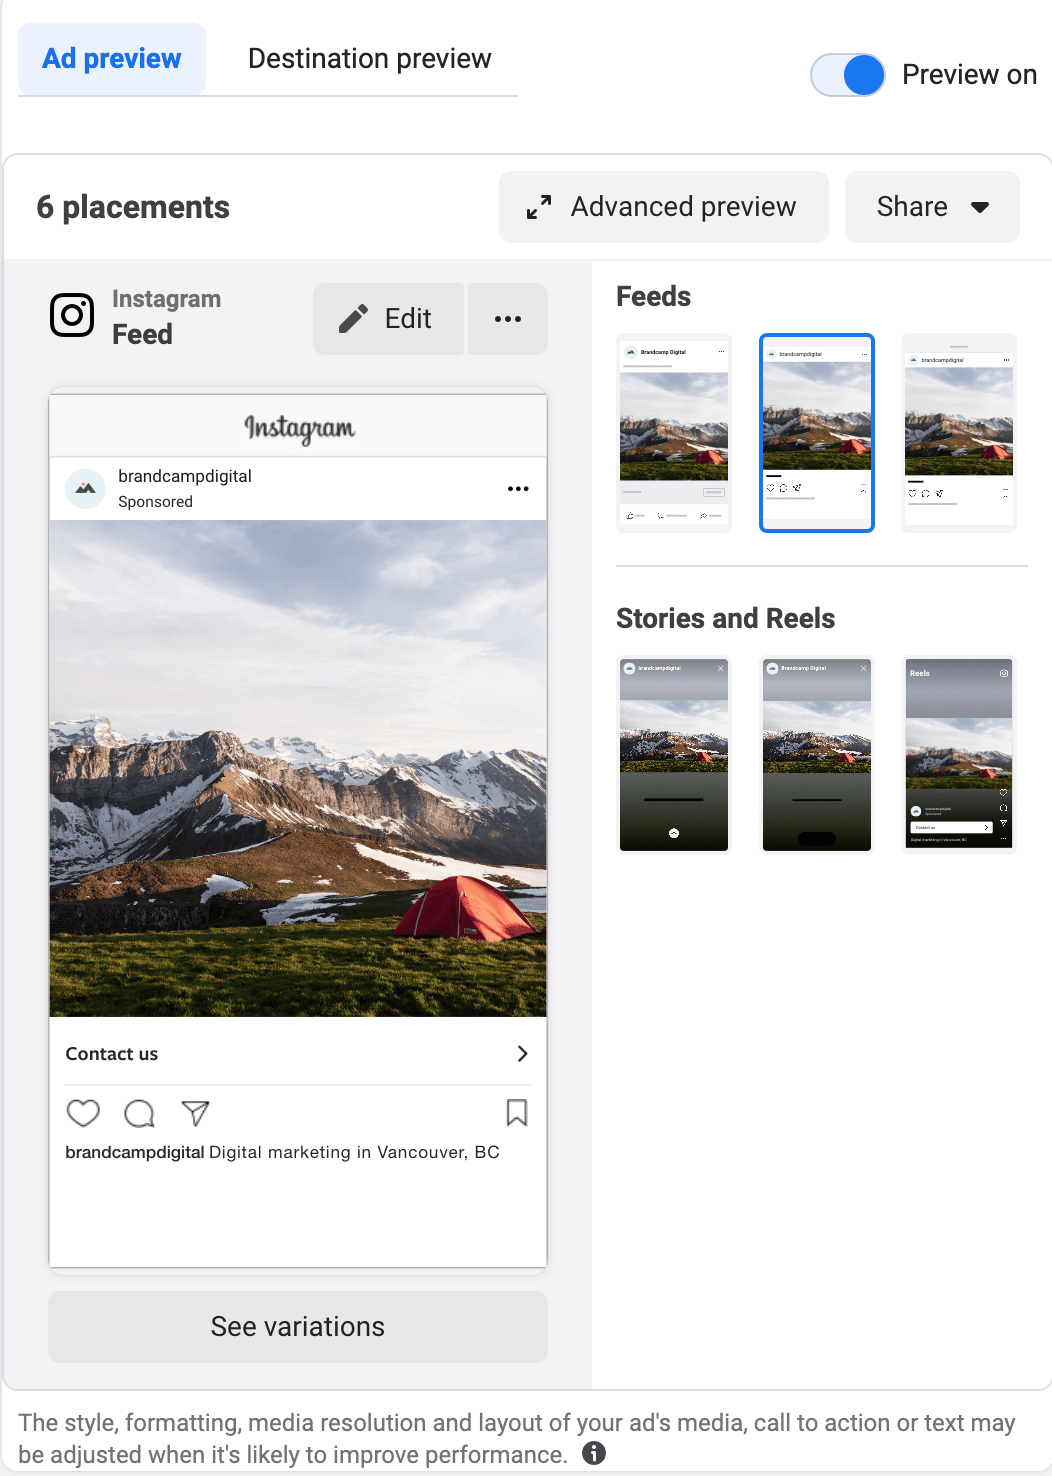
Step 7: Choose your Instagram ad placements
In the Placements section, you can decide where your ads will appear.
There are two options:
- Advantage+ Placements: Ads will be shown to your audience wherever they’re likely to perform best.
- Manual Placements: You can choose specifically where your ad will appear (and not appear). If you want to limit your ads to show only on Instagram (not Facebook), you can choose these using Manual Placements.
If you’re new to Instagram advertising, we recommend going with Advantage+ placements.
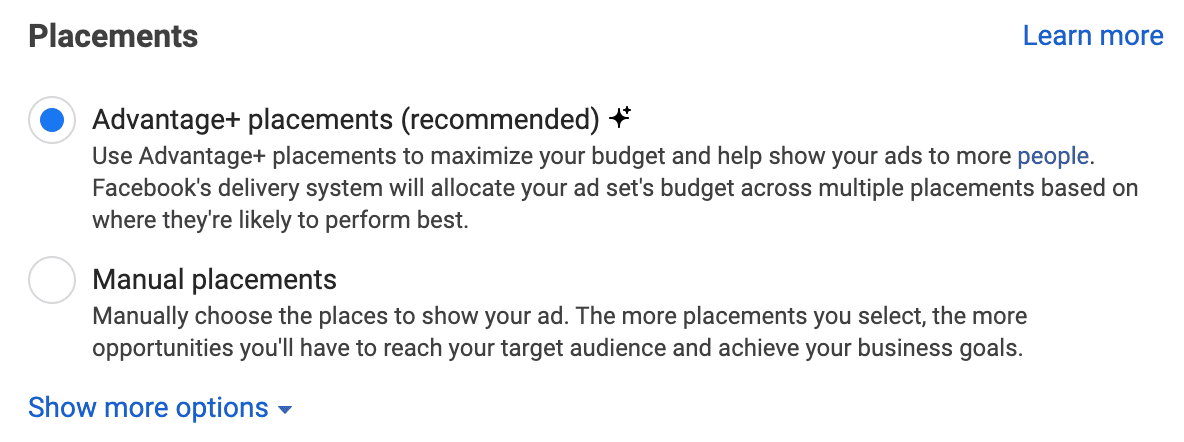
If you choose manual placements, the Ads Manager will display the technical requirements for each one.
Step 8: Create a new Instagram ad
Finally, it’s time to create your new Instagram ad. Choose New [your goal here] Ad from the left-hand menu. This will open up a screen where you can customize your new Instagram ad.
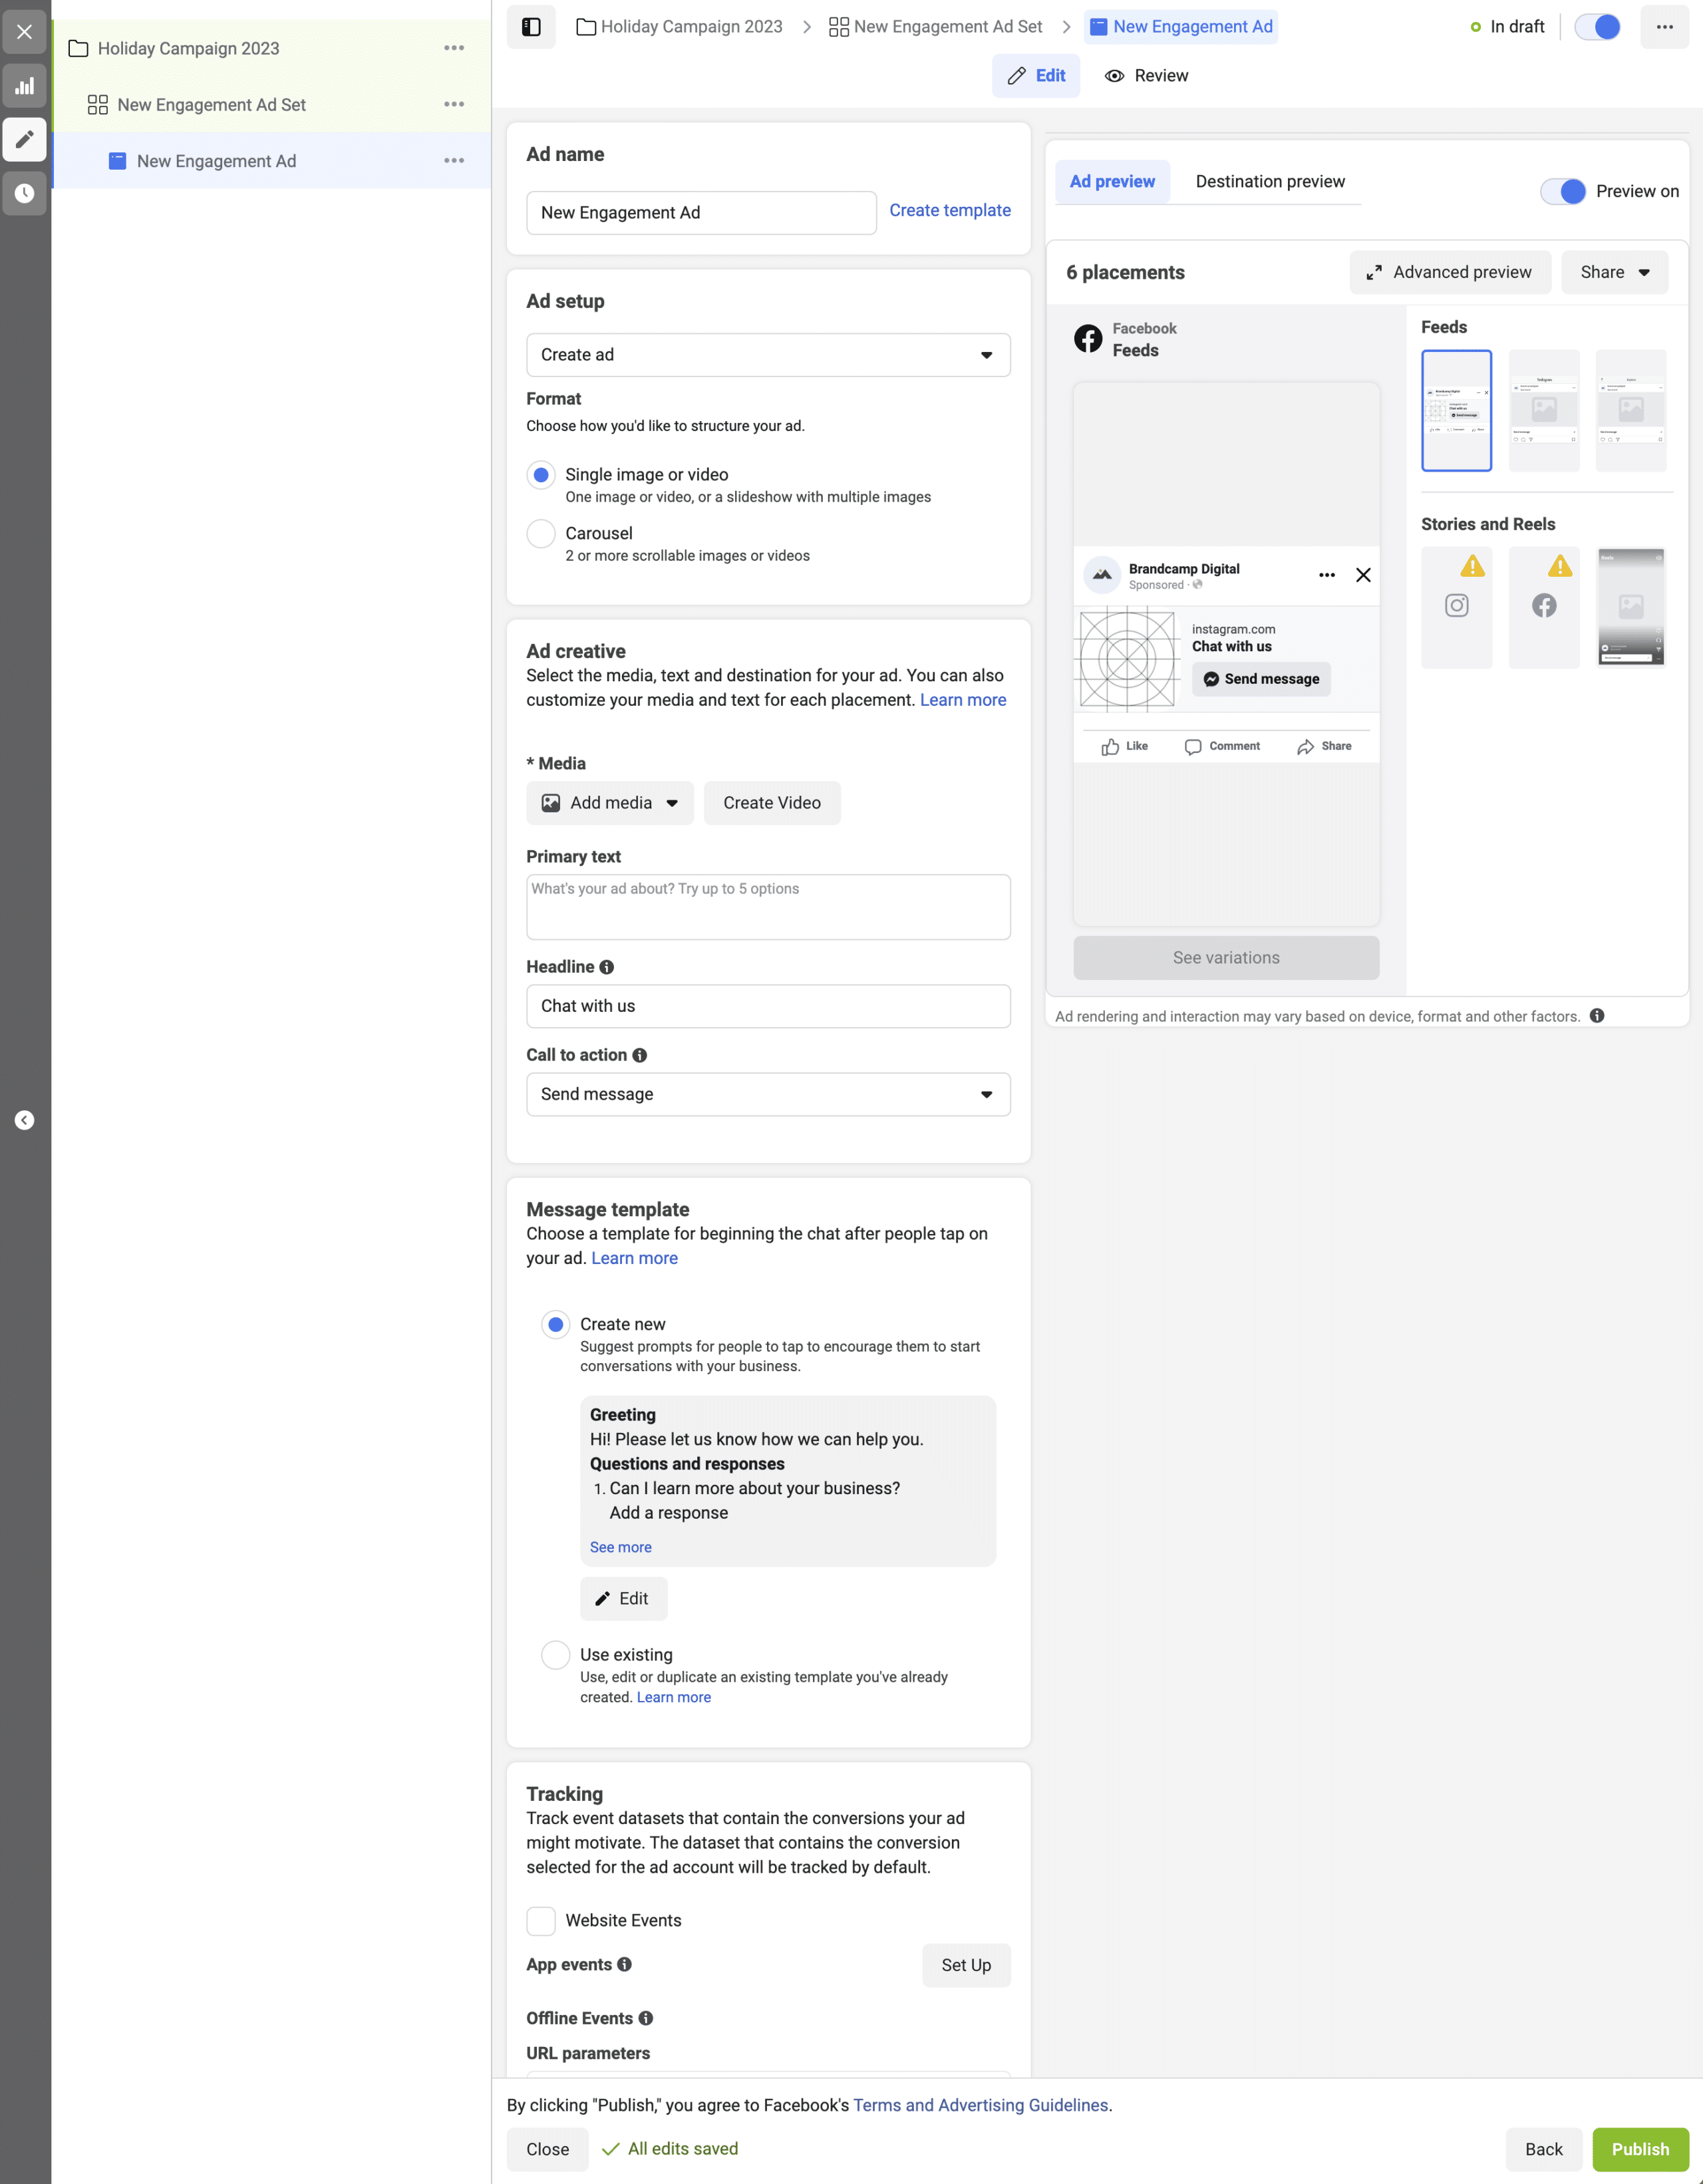
Here, you can edit your ad name, choose from different Instagram ad types, and add creative elements like images, videos, headlines, and CTAs.
You can also add any copy, website links, and tracking parameters on this screen.
If you want to track conversions from your ad, it’s important to select the Facebook Pixel in the Tracking section.
Step 8: Publish your Instagram ad
Once you’ve filled out all the necessary fields, click Publish in the bottom right-hand corner of your screen.
Your Instagram ads will now run on the chosen budget and timeline. Be sure to check your Instagram Analytics regularly to see how your ads perform.