
You have tried several Facebook advertising tools, but they have not been very effective in reaching customers and generating sales. You are interested in learning more about Facebook Dynamic Ads and how to create and set them up to help your business increase revenue and save advertising costs.
If so, Dynamic Ads is the best type of Facebook Ads for businesses looking to increase their sales and reach more customers.
What is Facebook Dynamic Ads?
Dynamic Advertising is a form of ads that targets the needs of potential customers and is used on Facebook, Instagram, Messenger, and Audience Network.

Dynamic Ads acts like a “detective” that tracks the behavior of users regarding products, services, or websites they have viewed, accessed, or interacted with. This allows it to automatically change images and content that are appropriate for each target customers.
Businesses do not need to create ads for each product, but can create an automatic template using available image sources and product information. Instead of having to perform Facebook Remarketing, Dynamic Ads helps businesses create customized ad content for each target customer.
Facebook Dynamic Ads prerequisites
To set up Dynamic Ads, you need the following prerequisites:
- Product Catalog: A list of products with complete information about prices, usage, and descriptions.
- Facebook Pixel: Pixel is a code installed on the website.
Now that you have the prerequisites, let’s dive into the specific steps to create Dynamic Ads!
How to set up Facebook Dynamic Ads
Here’s how to prepare your website and app, upload your product details, and ultimately create a Dynamic Ad.
Before you start
If you haven’t created a Facebook Ad account yet, create one by visiting the Ads Manager. Also, having a Facebook Page is mandatory for running Dynamic Ads. You might have to optimize or create yours to represent your brand.
Lastly, if you’re using Business Manager, make sure it’s set up to facilitate Dynamic Ads. Keep in mind that you should have full control of the business account to make these configurations, or you’ll have to ask someone who does.
Now, let’s get started with setting up your Dynamic Ads in a three-part procedure.
Part 1: Set up your catalog
Organize your product catalog. This is where you’ll list all the items you want to advertise.
1. Navigate to the Commerce Manager. Then, Start creating your catalog. If it’s your first catalog, click on ‘Get Started.’ Then, choose ‘Create a catalog’ followed by ‘Get Started’ again. If you already have a catalog, you’ll see it.

2. Choose the type of inventory you’re working with (e.g., ecommerce for products) and click ‘Next.’

3. Here, you’ll need to ‘Upload Product Info’.
You can do this manually in Commerce Manager. Alternatively, upload your data automatically by selecting ‘Connect a partner platform’ such as Shopify, or WooCommerce.

4. Choose the business account associated under the ‘Catalog owner’. Also, name your list and click ‘Create’ to finalize your new catalog.

6. After creating your catalog, you can start adding your items by clicking on ‘View Catalog’ and then, ‘Add items’. Choose your ideal method to upload your item lists.

Once completed, your catalog is ready to use.
Part 2: Integrating Facebook Pixel and SDK
Incorporate the Facebook Pixel on your website and/or the Facebook SDK in your app. This setup is critical for tracking user interactions and tailoring your ads. Here’s how to do this:
- Go to the Commerce Manager and select your catalog.
- In the Catalog tab, find and click on ‘Events’.

- Manage event sources by selecting an option in the ‘Set up tracking’ section:

- If you choose to track mobile events, you’ll need to activate the SDK.

- Download the appropriate Facebook SDK for your app (iOS or Android) from your app dashboard.
- Integrate the SDK into your mobile app, or provide instructions to a developer to do so.
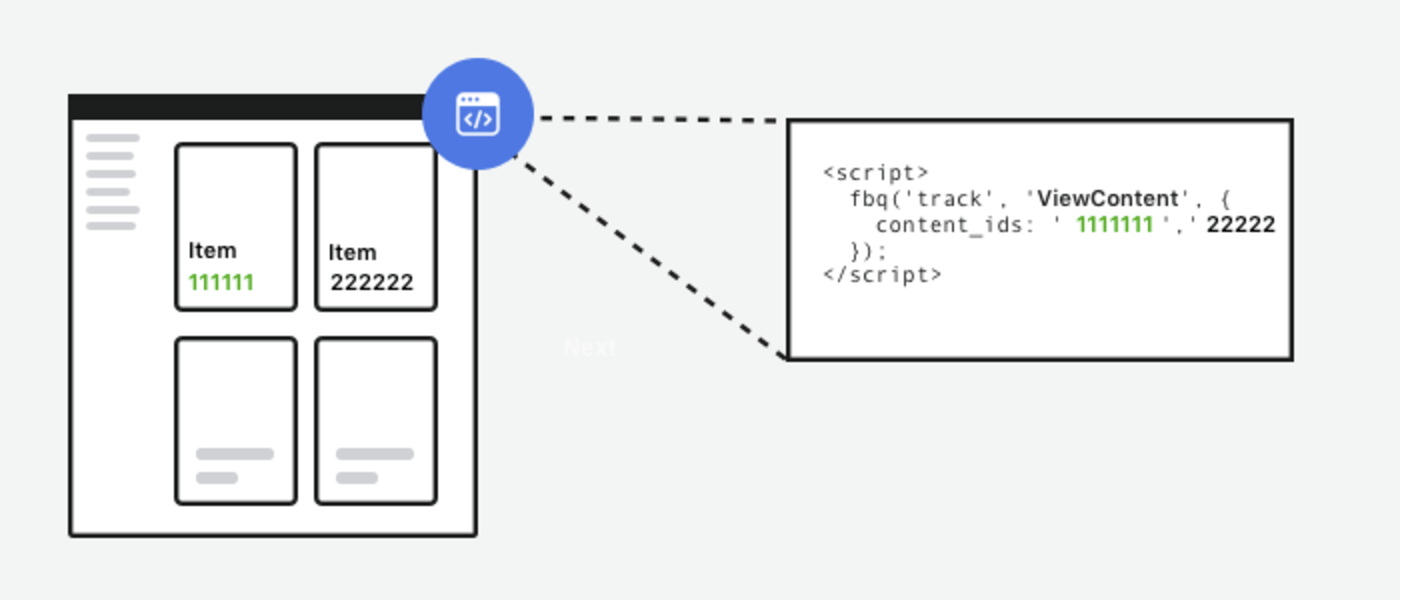
- In your app dashboard, add content IDs for the ViewContent, AddToCart, and Purchase mobile app events to your SDK.
b) For tracking website events, you’ll have set up your Facebook Pixel instead:
- Create a Facebook Pixel in Events Manager.
- Install the pixel code on your website or provide developer instructions.
- Include content IDs for ViewContent, AddToCart, and Purchase website events in your pixel installation. This gives each item on your site a unique content ID that matches an item ID in your catalog.
Lastly, you’ll then be directed to the Events Manager to configure your Facebook Pixel. Here’s all you need to know for setting up your Facebook Pixel.
Your pixel or app SDK is now connected to your catalog. It might take up to 24 hours to activate fully. Once ready, you can monitor your event to item match rate.
Here’s how to install a Facebook Pixel on your website.
Part 3: Creating your Dynamic Ad (Advantage+ Catalog Ad)
This step is a combination of the last two, where you’ll put together your Dynamic Ad and the catalog and tracking data. This lets you target and personalize your ad content.
Here, you’ll create your final Facebook’s Advantage+ Catalog Ads, in order to leverage Facebook’s extensive advertising network to effectively promote your products and reach the right audience with tailored, automated ads. All you have to do is:
Step 1: Go back to Meta Ads Manager and click on ‘+ Create’.

2. Select your campaign objective from sales, app promotion, leads, engagement, or traffic.
- If you choose the “Sales” objective, you will then need to select a product catalog from the “Select Product Catalog” dropdown menu.

- If you choose “Traffic,” “Engagement,” or “Leads,” you will need to specify both the product catalog and product set when you create your ads.
Step 2: Configure your Ad Set
- In the Ad Set setup step, type in a name for your ad set.
- If you selected the “Sales” as your objective, you will see the option to select an existing product set from your catalog. Choose the product set that matches your campaign objectives.
- Click “Continue” to proceed to the next step.
Step 4: Choose your Ad Placement
- In the Placement step, you can choose to automatically target the suggested placements, or you can manually pick placements, as with other campaign types. Adjust your placement preferences based on your campaign goals and audience.
Step 5: Complete your Ad Setup
- In the Ad setup step, name your ad and fill in the rest of the information.
- Choose between “Advantage+ catalog single image” or “Advantage+ catalog carousel” for your ad format.
- Click “Continue” to proceed.
Step 6: Set up your ad’s creatives
- In the Creative setup step, you can add placeholders to your ad copy. These placeholders will make the text or product deep links dynamic, depending on the product Facebook selects when displaying the ad to your audience (e.g., product name, price, brand, etc.).
Step 7: Decide on budget and schedule
- On the final screen, customize your ad budget and scheduling options based on your campaign strategy.
- Review all the settings to ensure they align with your campaign objectives.
- Click “Create Ad” to complete the setup of your Advantage+ Catalog Ad.
Your campaign is now set up and ready to run. Facebook will display your ads to your selected audience based on your campaign objectives and targeting settings.
3. Type in the rest of the campaign information, including the campaign name, labels, and budget. Then, click “Create and Continue to Ad Set.”
- For sales: Choose ‘Use a catalog’ at the campaign level.
- For app promotion, engagement, leads, or traffic: Select your catalog (product list) at the ad level. Note that dynamic audience options are not available for these objectives.
4. Set up your ‘Ad set’: Pick the product set from your catalog for the ad. Remember, the audience options are based on your pixel activity. You can either retarget current customers or aim for a broader audience.
Define Your Audience: You can create a custom audience based on past website or app activity, or use broad audience targeting to reach new potential customers.
Select your Ad placement: Ensure that ‘Instagram’ is selected under Placements. You can choose to have your ads appear in the Instagram feed, stories, or both.
Budget and Schedule: Set your budget and decide on the schedule for your ad campaign.
- Design Your Ad:
- For automated, varied formats, turn on Advantage+ creative. This shows different media types (images or videos) based on what each viewer is likely to engage with.
- Alternatively, choose a format like Single image/video, Carousel, or Collection.
If not using Advantage+ creative, use the Creative tools to tailor your ad’s visuals.
- Type in your ad’s text and CTA. This includes a headline, description, and primary text. Also, consider adding a call-to-action button. You can also Select ‘Add languages’ if you’re targeting multiple countries and languages.
- Set up tracking with Facebook Pixel events or required app events.
- Check your ad’s appearance in the preview, then either publish it or save your changes by selecting ‘Close’.